Microsoft Excel is a powerful tool for managing and analyzing data. Among its many features, macros stand out for their ability to automate repetitive tasks, not only in Excel but also across various Microsoft Office programs such as Word and PowerPoint. By using macros, you can automate tasks, saving time and reducing errors.
To access these automation features, users need to enable macros for each Excel file that contains them, but it’’s important to be aware that enabling macros can introduce a security risk if the source is untrusted. Enabling macros can expose your system to macro viruses, which are a type of malicious software. Understanding the security risk associated with enabling macros is crucial for safe and effective use.
For example, if you choose to enable all macros, this setting is not recommended because dangerous code can run, posing a significant security threat. To avoid repeated security prompts, you can mark files as trusted documents, allowing macros to run without further warnings. By default, macros are disabled in Excel to protect users from potential threats.
This post will cover what macros are, their benefits, and the step-by-step process to enable and use them in Excel.
Table Of Content – How to Enable Macros in Microsoft Excel
What is a Macro?
A macro in Microsoft Excel is a series of instructions programmed to automate repetitive tasks. Macros are created using Visual Basic for Applications (VBA), Excel’s programming language. VBA macros are a type of macro written in VBA code, which allows users to automate complex tasks.
With macros, you can record actions like formatting, calculations, and data entry and replay them with a single click. Users can create macros to automate tasks, and these macros are stored either in the current workbook or in a personal macro workbook for use across multiple files. The VBA environment in Excel provides tools for writing, editing, and managing VBA code for macros.
Example of Macro Usage:
- Formatting large datasets consistently.
- Automating report generation.
- Performing bulk edits across multiple worksheets.
Macros not only enhance productivity but also simplify complex workflows for both beginners and advanced users.
Benefits of Macros in Excel
Using macros in Excel comes with numerous advantages:
- Time-Saving: Automates repetitive processes, letting you focus on more critical tasks.
- Reduces Errors: Standardizes workflows, minimizing the chance of manual mistakes.
- Improves Productivity: Enhances efficiency for both individual and team projects.
- Customizable: Offers flexibility to create tailored solutions for specific needs
- Scalable: Works seamlessly across various datasets and tasks, regardless of size.
To further improve productivity and security, you can change macro settings and change macro security settings in Excel. By changing settings in the Trust Center, you can customize how and where macros run, including enabling or disabling macros and adjusting macro security levels. Using trusted locations or designating a trusted location allows you to run macros stored in specific folders without repeated security prompts, making your workflow more efficient while maintaining safety.
Introduction to Macros in Excel
Macros in Excel are powerful tools designed to automate repetitive tasks, helping users save time and boost productivity. By enabling macros, you can execute a series of commands or instructions with a single click or keystroke, making it easier to perform actions like formatting cells, inserting formulas, copying data, or generating charts. However, because macros in Excel can contain potentially dangerous code, Excel disables macros by default and displays security warnings when you open a file that contains them.
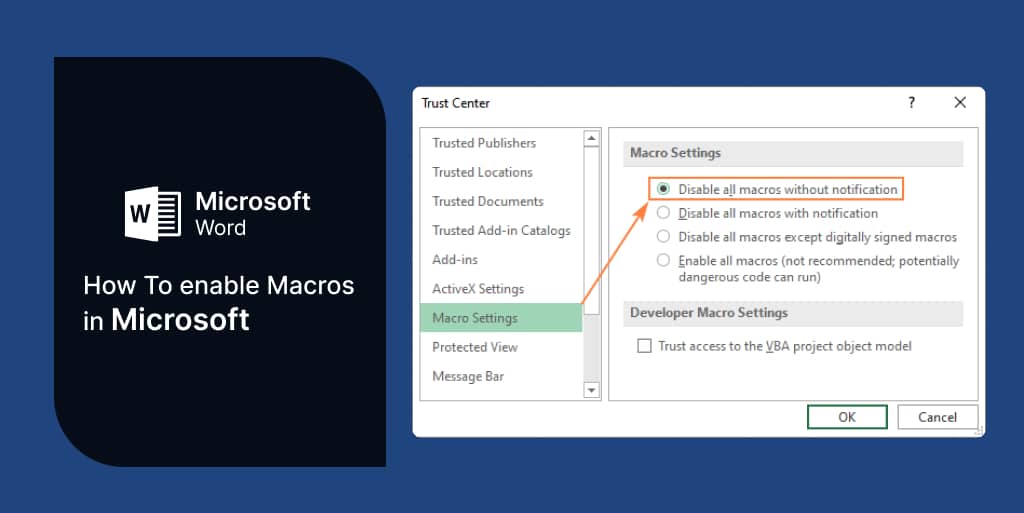
To manage these potential security risks, Excel provides robust macro security settings through the Trust Center. The Trust Center settings allow you to control how macros are handled in your Excel files. You can choose to disable all macros, enable macros with notification (so you decide on a case-by-case basis), or allow only digitally signed macros from trusted publishers to run. While enabling all macros is possible, it is not recommended, as it can expose your system to malicious code.
VBA macros, which are created using the Visual Basic Editor or the Macro Recorder, are typically stored in macro-enabled workbooks with the .xlsm file extension. For users who want to access their macros across multiple files, Excel offers the option to store them in a personal macro workbook—a hidden file that loads automatically whenever Excel opens. This makes it easy to automate repetitive tasks across all your workbooks.
To change macro security settings, you can access the Trust Center via the File tab or the Developer tab and select the macro settings that best fit your needs. If your device is managed by a work or school system administrator, you may find that some macro settings are restricted. In such cases, consult your system administrator or IT department for assistance.
Creating macros can be as simple as recording your actions with the Macro Recorder or as advanced as writing custom VBA code in the Visual Basic Editor. If you need to disable macros, you can either avoid enabling content when prompted or adjust your macro settings to disable all macros. Keep in mind that disabling macros will prevent you from using their automation features, so it’s important to strike the right balance between productivity and security.
By understanding how to enable macros and manage macro security settings, you can take full advantage of Excel’s automation capabilities while keeping your data and system safe.
Macro Security and Security Warning
When working with macros in Excel, understanding macro security is essential to protect your data and computer from potentially dangerous code. Macros can automate repetitive tasks and boost productivity, but they can also carry security risks if they contain harmful or malicious code. That’s why Excel includes robust macro security features to help you manage these risks.
Whenever you open an Excel workbook that contains macros, you’ll typically see a security warning dialog at the top of the window. This message bar alerts you that macros are present and gives you the option to Enable Content or Disable Content. If you trust the source of the file, you can enable macros, allowing them to run and marking the workbook as a trusted document. The next time you open this trusted document, macros will be enabled automatically, and you won’t see the security warning again. If you’re unsure about the file’s origin, it’s safer to disable macros to prevent any potentially dangerous code from running. If you choose not to enable macros, macros remain disabled for that file.
To take control of your macro security settings, Excel provides several options in the Trust Center. Here’s how you can access and adjust these settings:
- Click the File tab.
- Select Options.
- Go to Trust Center and click Trust Center Settings.
- Click Security to review or change security options.
- Choose Macro Settings to view your options and configure trust center macro settings.
Step 1: Enable the Developer Tab
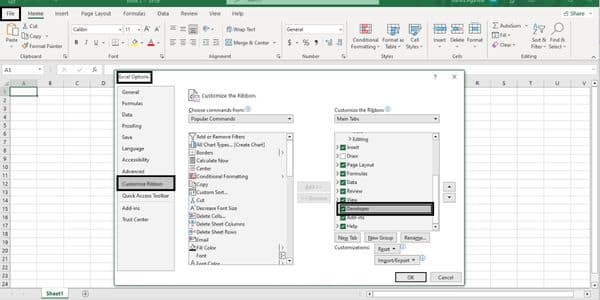
Before creating macros in Microsoft Excel, enable the Developer tab. To do this, follow these steps:
- Open Microsoft Excel and click “File” on the menu bar at the top of the window
- Click on “Options” in the bottom left corner.
- Click on “Customize Ribbon” in the left-hand column. You may need to use a drop down menu to access additional options or customize the ribbon.
- In the right-hand column, check the box next to “Developer.”
- Click on “OK”.
The Developer tab will now appear in the ribbon, providing tools for macro creation and management.
Note: On some versions of Excel, you may need to select preferences to further customize the Developer tab or macro options.

Step 2: Record a Macro
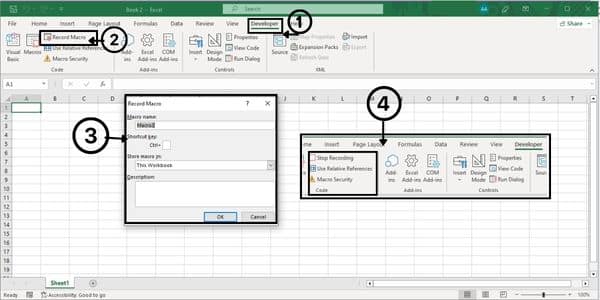
Once the Developer tab is enabled, you can start recording a macro. To record a macro, follow these steps:
- Click on the “Developer” tab in the ribbon.
- Click the “Record Macro” button in the “Code” group.
- In the “Record Macro” dialog box, enter a name for the macro.
- Choose where to save the macro (in the current workbook or in a new workbook).
- Assign a keyboard shortcut to the macro if desired.
- Click on “OK”.
- Perform the actions you want to automate while the macro is being recorded.
- Click the “Stop Recording” button in the “Code” group.

When recording or running macros, you may see a yellow bar or a warning message at the top of the Excel window. This is a security alert prompting you to click enable content to allow macros to run. Excel offers several macro security options in the Trust Center: enable all macros (allows all macros to run), disable all macros (blocks all macros), disable all macros except digitally signed macros (only allows macros signed by a trusted publisher to run), macros with notification (notifies you before enabling macros), and macros without notification (disables all macros silently).
Macros that are digitally signed or signed macros from a trusted publisher are considered safer and may run without security alerts, while unsigned macros or macros except digitally signed may trigger security alerts or be disabled. Always pay attention to security alerts and warning messages, as they indicate potential security risks. If you do not enable macros when prompted, macros remain disabled and will not run.
Step 3: Edit a Macro
You can edit the code if you need to change a macro you have already recorded. To edit a macro, follow these steps:
- Click on the “Developer” tab in the ribbon.
- Click on the “Visual Basic” button in the “Code” group.
- In the Visual Basic Editor, locate the module that contains the macro.
- Double-click on the module to open it.
- Find the macro that you want to edit and make the necessary changes.
- Save and close the module

When editing macros in the Visual Basic Editor, you may need programmatic access to the VBA project object model. You can manage trust access to this feature in the macro security settings within the Trust Center. For security, you can choose to disable VBA macros to prevent harmful code from running. Always be cautious when allowing macros to run, especially if they are not from a trusted source, as malicious macros can pose significant risks.
Step 4: Run a Macro
To run a macro, you first need to open Excel. After creating a macro, you can run it at any time. To run a macro, follow these steps:
- Click on the “Developer” tab in the ribbon.
- Click on the “Macros” button in the “Code” group.
- In the “Macros” dialog box, select the macro that you want to run.
- Click on “Run”.
After running your macro or making changes, remember to close Excel to ensure your work is saved and any deleted macros are permanently removed.
By default, Excel disables macros as a security measure to protect users from potential security risks. This default setting helps prevent dangerous code from running automatically. If macros are disabled, you will need to adjust your trust center macro settings or respond to security prompts to enable them. Enabling all macros is not recommended because recommended potentially dangerous code or macros not recommended potentially settings can allow malicious or harmful code to execute. If your organization manages macro settings, consult your system administrator before changing any restrictions.
In conclusion, creating macros in Microsoft Excel can save you time and effort by automating repetitive tasks. By following these steps, you can create, edit, and run macros in Excel to make your work more efficient and effective. If you want to buy Windows 10, then Indigo Software is the best choice for purchasing an operating system. You will also receive genuine Office Suite from Microsoft software downloads from our platform.

