Looking to run a Windows 11 virtual machine without modifying your primary system? Hyper-V, Microsoft’s built-in virtualization platform, is a powerful tool for developers, testers, and tech enthusiasts in the USA and beyond. Whether you’re testing software, developing apps, or exploring Windows 11, this guide walks you through setting up a Windows 11 VM in Hyper-V step-by-step.
At Indigo Software, we provide authentic Microsoft software licenses, including Windows 11 and Microsoft Office, at unbeatable prices. Let’s get started with your Hyper-V setup!
Why Use a Windows 11 Virtual Machine?
A Windows 11 virtual machine offers a safe, isolated environment for:
- Software Testing: Test apps or updates without risking your main system.
- Development: Build and debug applications in a clean Windows 11 environment.
- Exploration: Try Windows 11 features without upgrading your physical PC.
- Sandboxing: Analyze malware or run untrusted software securely.
Hyper-V is ideal for developers and testers due to its integration with Windows 10/11 Pro and Enterprise editions, offering robust virtualization capabilities.
Prerequisites for Setting Up a Windows 11 VM
Before you begin, ensure you have:
- A Windows 10/11 Pro or Enterprise host system with Hyper-V enabled.
- A CPU supporting virtualization (Intel VT-x or AMD-V with SLAT).
- At least 8 GB RAM (16 GB recommended) and 70 GB disk space.
- A Windows 11 ISO file from Microsoft.
- Sufficient storage for the virtual hard disk (VHD).
- Optional: A genuine Windows 11 license from Indigo Software.
Step 1: Enable Hyper-V on Your System
Hyper-V is available on Windows 10/11 Pro and Enterprise but may need activation:
- Open Control Panel > Programs > Turn Windows features on or off.
- Check Hyper-V (including Hyper-V Platform and Management Tools).
- Click OK and restart your PC.
Verify your CPU supports virtualization by checking your BIOS/UEFI settings for VT-x or AMD-V.
Step 2: Download the Windows 11 ISO
To install Windows 11 on your VM:
- Visit indigo software Windows category page and buy window 11.
- Select Windows 11 (multi-edition ISO).
- Choose your language (e.g., English – United States).
- Click 64-bit Download to save the Windows 11 ISO.
Ensure the ISO is not corrupted by verifying its checksum on Microsoft’s site.
Step 3: Launch Hyper-V Manager
- Press Win + S, type Hyper-V Manager, and open it.
- In the left pane, select your PC’s name.
- Click New > Virtual Machine to start the New Virtual Machine Wizard.
Step 4: Configure Your Windows 11 Virtual Machine
Follow the wizard to set up your Windows 11 VM:
- Name: Enter a name (e.g., “Indigo Windows 11 VM”).
- Generation: Choose Generation 2 for Secure Boot and TPM support.
- Memory: Assign 4096 MB (4 GB) and enable Dynamic Memory.
- Networking: Select Default Switch or configure a custom network.
- Virtual Hard Disk: Create a new VHD with 70 GB (or more).
- Installation Options: Choose Install an operating system from a bootable image file, then browse to your Windows 11 ISO.
Click Finish to create the VM.
Step 5: Enable TPM and Secure Boot
Windows 11 requires TPM 2.0 and Secure Boot. To enable them:
- In Hyper-V Manager, right-click your VM and select Settings.
- Go to Security.
- Check Enable Trusted Platform Module (TPM) and Enable Secure Boot.
- Click Apply and OK.
These settings ensure compliance with Windows 11 system requirements.
Step 6: Install Windows 11 on the VM
- Double-click your VM in Hyper-V Manager and click Start.
- Press any key to boot from the Windows 11 ISO (act quickly).
- Follow the Windows 11 Setup Wizard:
- Select language and keyboard layout.
- Choose Windows 11 Pro (or your preferred edition).
- Skip the product key (activate later with a license from Indigo Software).
- Accept the license terms.
- Select Custom: Install Windows only.
- Choose the virtual disk and click Next to begin installation.
The Windows 11 installation will take 10–20 minutes. Complete the out-of-box experience (OOBE) setup as you would on a physical PC.
Step 7: Optimize VM Performance
To enhance your Windows 11 VM performance:
- Increase Resources: Allocate more RAM (e.g., 8 GB) or CPU cores via Settings.
- Install Integration Services: In the VM, go to Action > Insert Integration Services Setup Disk and follow the prompts.
- Update Drivers: Install Hyper-V-specific drivers for better graphics and networking.
Troubleshooting Common Issues
- VM Won’t Boot from ISO: Ensure you press a key during the boot prompt. Verify the ISO path in Settings.
- TPM/Secure Boot Error: Double-check TPM and Secure Boot are enabled in VM Settings.
- Performance Lag: Increase RAM, CPU cores, or disk space. Disable unnecessary Windows 11 features like animations.
- Activation Issues: Purchase a genuine Windows 11 license from Indigo Software to activate your VM.
Comparing VM Configurations
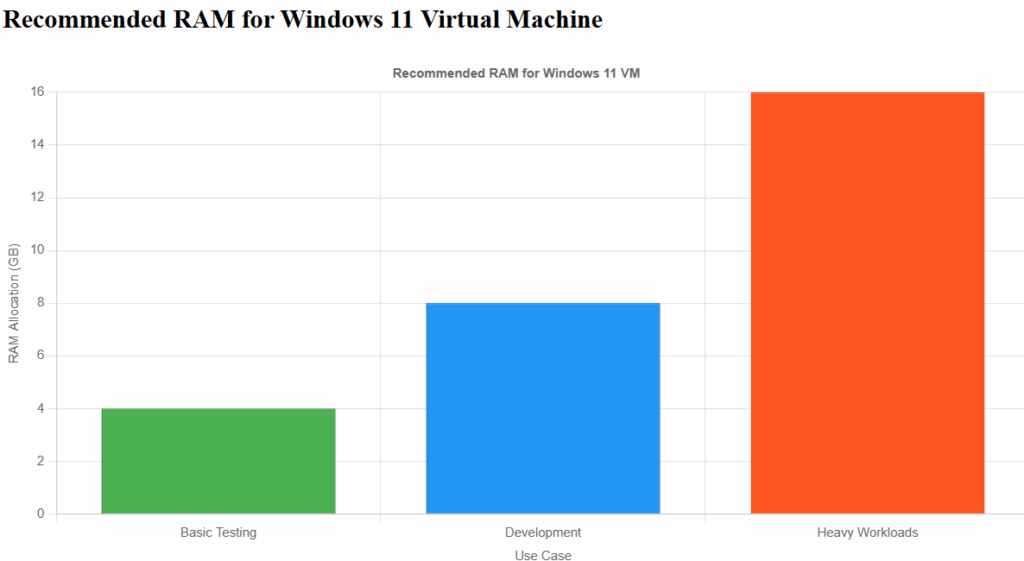
The chart below shows recommended resource allocations for different use cases:

Licensing Considerations
Running a Windows 11 virtual machine requires a valid license, especially for commercial use. Microsoft’s terms mandate a separate license for each VM instance. At Indigo Software, we offer:
- Windows 11 Pro licenses for VMs.
- Microsoft Office (Home, Student, Pro) for productivity.
- Microsoft 365 subscriptions for cloud-based tools.
Shop now for authentic Microsoft software trusted by USA developers and testers.
Hyper-V vs. Other Virtualization Platforms
Compared to VMware or VirtualBox, Hyper-V offers:
- Native Integration: Built into Windows 10/11 Pro, no third-party software needed.
- Performance: Optimized for Microsoft workloads, ideal for Windows 11 VMs.
- Cost: Free with Windows Pro/Enterprise, unlike paid VMware licenses.
However, VMware may offer better cross-platform support, and VirtualBox is free for all OS types. Choose Hyper-V for seamless Windows 11 virtualization.
Watch Our Video Tutorial
For a visual guide, check out our YouTube tutorial on setting up a Windows 11 virtual machine in Hyper-V. It covers every step with screenshots and tips.
Final Thoughts
Setting up a Windows 11 virtual machine in Hyper-V is a straightforward way to test, develop, or explore Windows 11 safely. With Hyper-V’s robust virtualization features and our step-by-step guide, you’re ready to create a high-performing Windows 11 VM.
Quick Look: How To Reset Windows 11 Without Losing Your Files
FAQs: Windows 11 Virtual Machine in Hyper-V
What are the system requirements for a Windows 11 VM?
You need a Windows 10/11 Pro or Enterprise host, a CPU with virtualization support (VT-x/AMD-V), 8 GB RAM, and 70 GB disk space.
Why does my VM fail to install Windows 11?
Ensure TPM and Secure Boot are enabled in VM Settings. Verify the Windows 11 ISO is not corrupted.
Do I need a separate license for a Windows 11 VM?
Yes, Microsoft requires a unique license per VM. Purchase one from Indigo Software.
Can I use Hyper-V for other operating systems?
Yes, Hyper-V supports Linux, Windows 10, and other OSes, but Windows 11 requires Generation 2 VMs for TPM and Secure Boot.

